


COACH EDUCATION
Rude Rock began as an outlet to "pay it forward", for all the content and resources we had when we first started. From free resources to paid products, we have everything you need to take your coaching to the next level.
CONTROLLING CHAOS
In 5 weeks, transform how you see, assess, and regulate chaos in elite environments. A performance mentorship for coaches who think in systems, not symptoms.

PRESENTATION MARKETPLACE
Get access to how we think, organize, and apply performance systems inside real training environments.

COACH'S PLAYBOOKS
A curated collection of practical, ready-to-use coaching resources designed to help you deliver better results with clarity and confidence.
BLOG ARTICLES
Wedges Are a Tool, Not a Trick
Wedges have been a common tool in performance and rehab spaces for a long time, and for good reason. They are simple, accessible, easy to implement, and they give coaches and therapists a way to change how the foot interacts with the ground almost immediately. But like a lot of useful tools, they can also get used too casually. A wedge gets thrown under the heel, under the big toe, under the outside of the foot, or somewhere near the arch, and the athlete is told to squat, shift, hold, or balance without much clarity on what the setup is actually supposed to change.
That does not make wedges useless. It just means they need to be used with more precision.
The majority of athletes I’ve worked with have some degree of limitation in their feet. That's not to say they all have a foot injury or “problem”, but the foot-ankle complex is commonly underdeveloped, under-coached, or underloaded relative to the demands placed on it. In team settings, the foot and ankle often get buried underneath the larger categories: lower-body strength, sprint mechanics, change of direction, conditioning, or rehab progressions. Even in rehab, the foot can become an afterthought unless the athlete has a clear foot or ankle diagnosis.
Neglecting the foot-ankle complex can quickly become problematic. The foot is the first structure to meet the ground and the last structure to leave it. So if the athlete cannot feel the ground, organize pressure, access usable range, tolerate deformation, hold position, or re-stiffen at the right time, the rest of the system must work around that. Sometimes that workaround shows up locally as plantar fasciitis, Achilles irritation, ankle instability, or calf symptoms. Other times it shows up somewhere else entirely: knee irritation, hip strategy, trunk compensation, poor braking, incomplete push-off, or a general lack of spring.
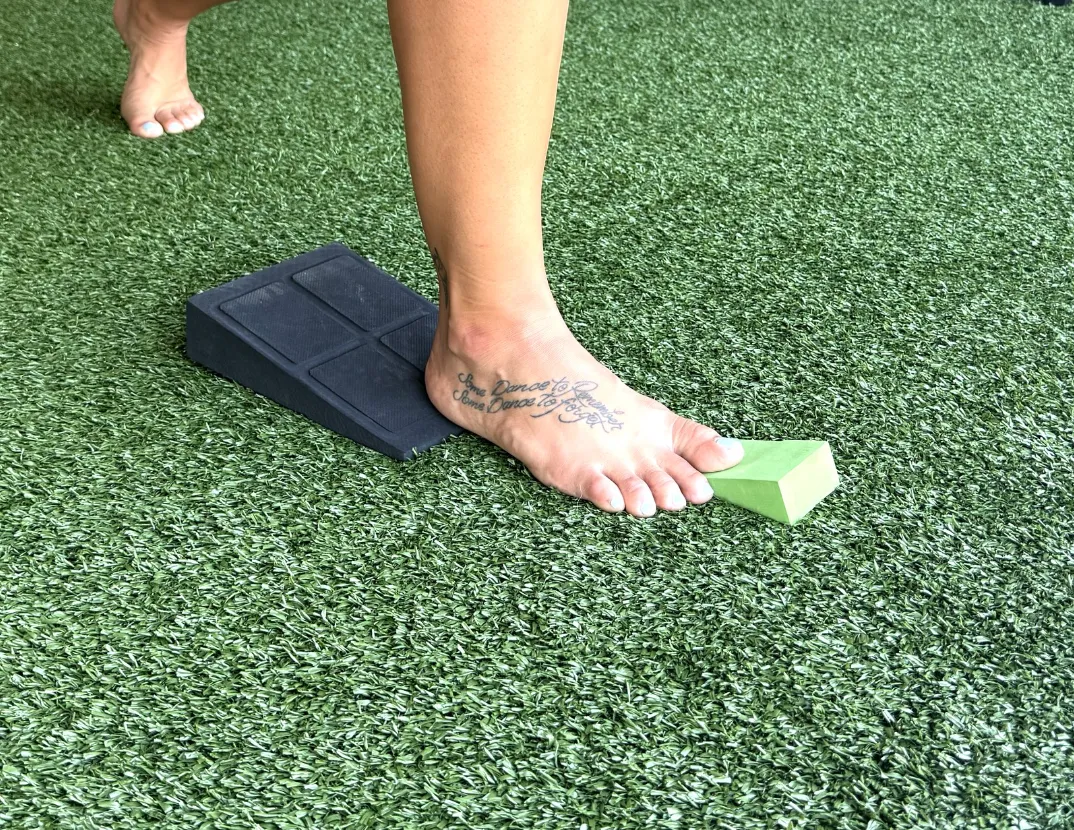
This is where wedges become useful. They give us a bridge between identifying a foot-ankle limitation and precisely loading the specific structures (or positions) that need to improve. The primary mechanism of wedges is modifying the contact points and therefore foot pressure, which influences the kinematics of the foot and everything up the chain. That gives the athlete a clearer task than simply standing on the floor and being told to “use the arch,” “find the big toe,” or “keep the knee out.”
A wedge is not magic. It does not automatically fix the foot, wake up the arch, unlock the ankle, or clean up a contact by itself. It changes the conditions. It gives the athlete a specific position to find and a specific pressure problem to solve. From there, the value comes from how well the athlete can feel it, hold it, and eventually move through it without gripping, collapsing, or escaping the position.
So the first question is not, “Should we use wedges with every athlete?” The answer is no. They are not a default requirement. But they are also not reserved only for athletes coming off foot and ankle injuries. I think about wedges when one of three things shows up.
The first is a pressure problem. The athlete cannot find or load a specific part of the foot. Maybe they cannot access the first ray without collapsing medially. Maybe they avoid the lateral column. Maybe they cannot feel the heel without sitting back into it. Maybe they grip the toes every time they try to stabilize.
The second is a position problem. The athlete may have the range or capacity somewhere in the system, but they cannot organize it in a usable stance. They can show you a shape on the table, but the second they stand, shift, squat, split, or load one side, the position disappears.
The third is a loading problem. The athlete needs exposure to the foot-ankle structures, but the full sporting demand is too aggressive, too fast, or too noisy. This is where wedges can be especially valuable. They let us load the foot in a safer, more controlled window while still asking for real tissue behavior: pressure, tension, deformation, stiffness, and positional control.
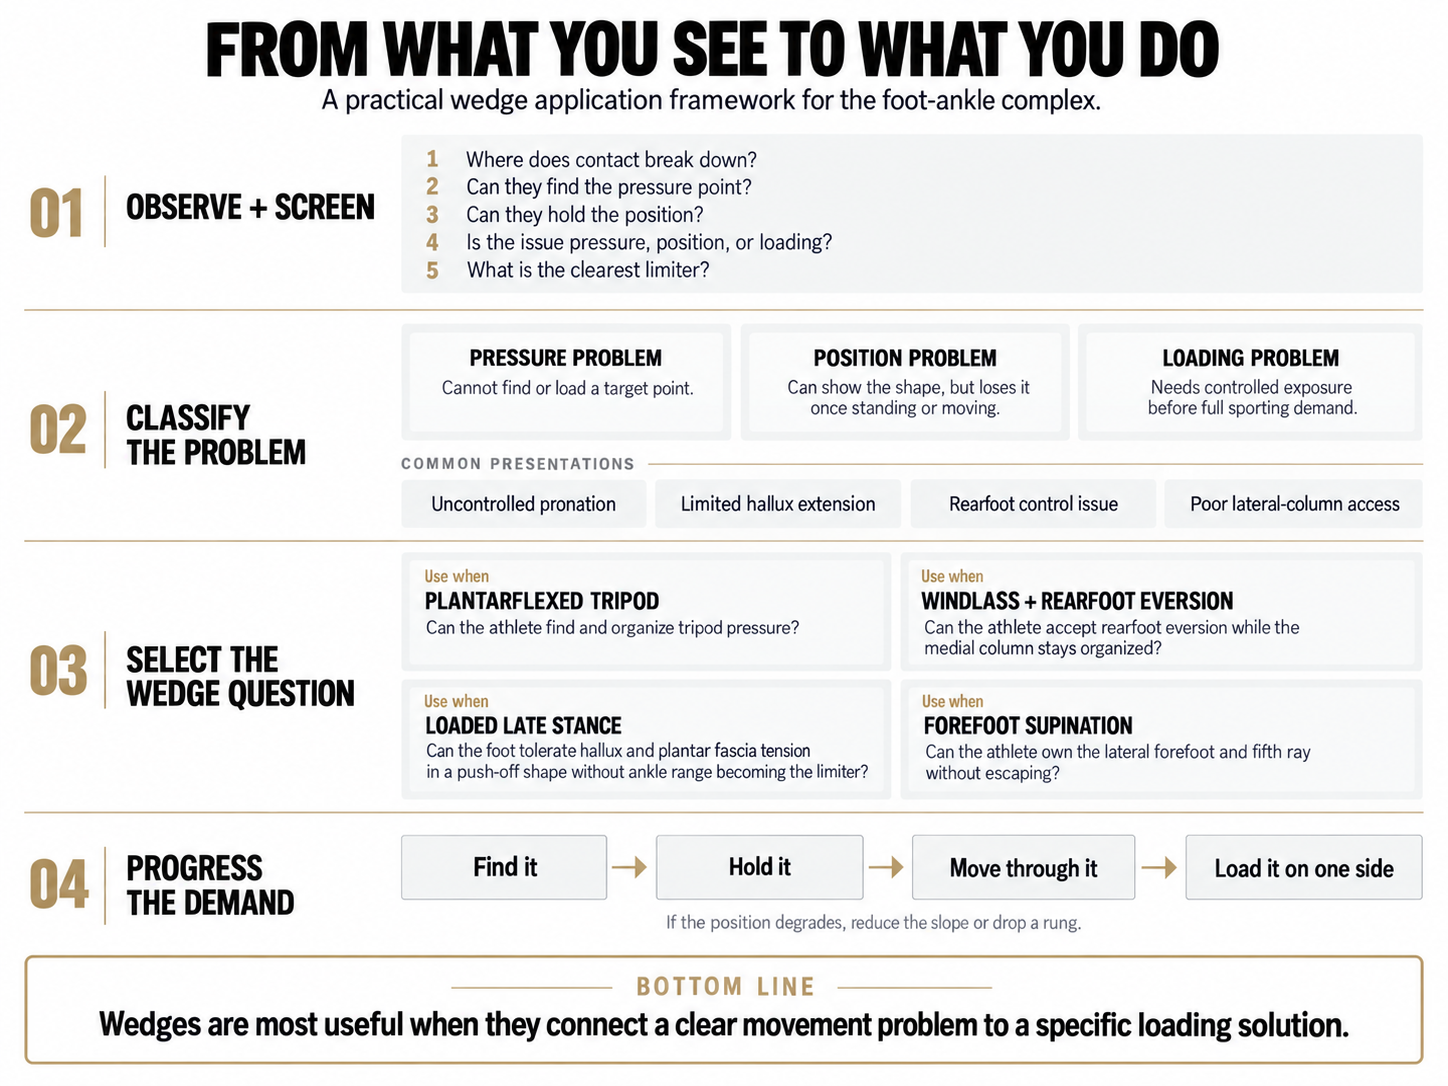
From there, the process is pretty simple. Observe the athlete first. Where does the contact break down? Are they struggling to find the ground, manage the transition, or finish the push-off? Then screen the position. Can they access the range? Can they find the pressure point? Can they hold the arch without gripping? Can the rearfoot move without the knee chasing it? Can they load the lateral column without rolling off the foot? Once we have some idea of the limiter, the wedge gives us a controlled way to build the missing piece.
The important part is that each wedge configuration should answer a different question. We are not just adding foam under the foot because it looks more advanced. We are choosing a setup because we want to know whether the athlete can find, load, and control a specific foot position.
For this overview, four configurations matter most: (I) plantarflexed tripod, (II) windlass plus rearfoot eversion, (III) loaded late stance, and (IV) forefoot supination. Each one has a different purpose, and each one gives the athlete a different problem to solve. The internal wedge resource organizes these as four defined configurations built from a small position library, with the same progression ladder shared across them.
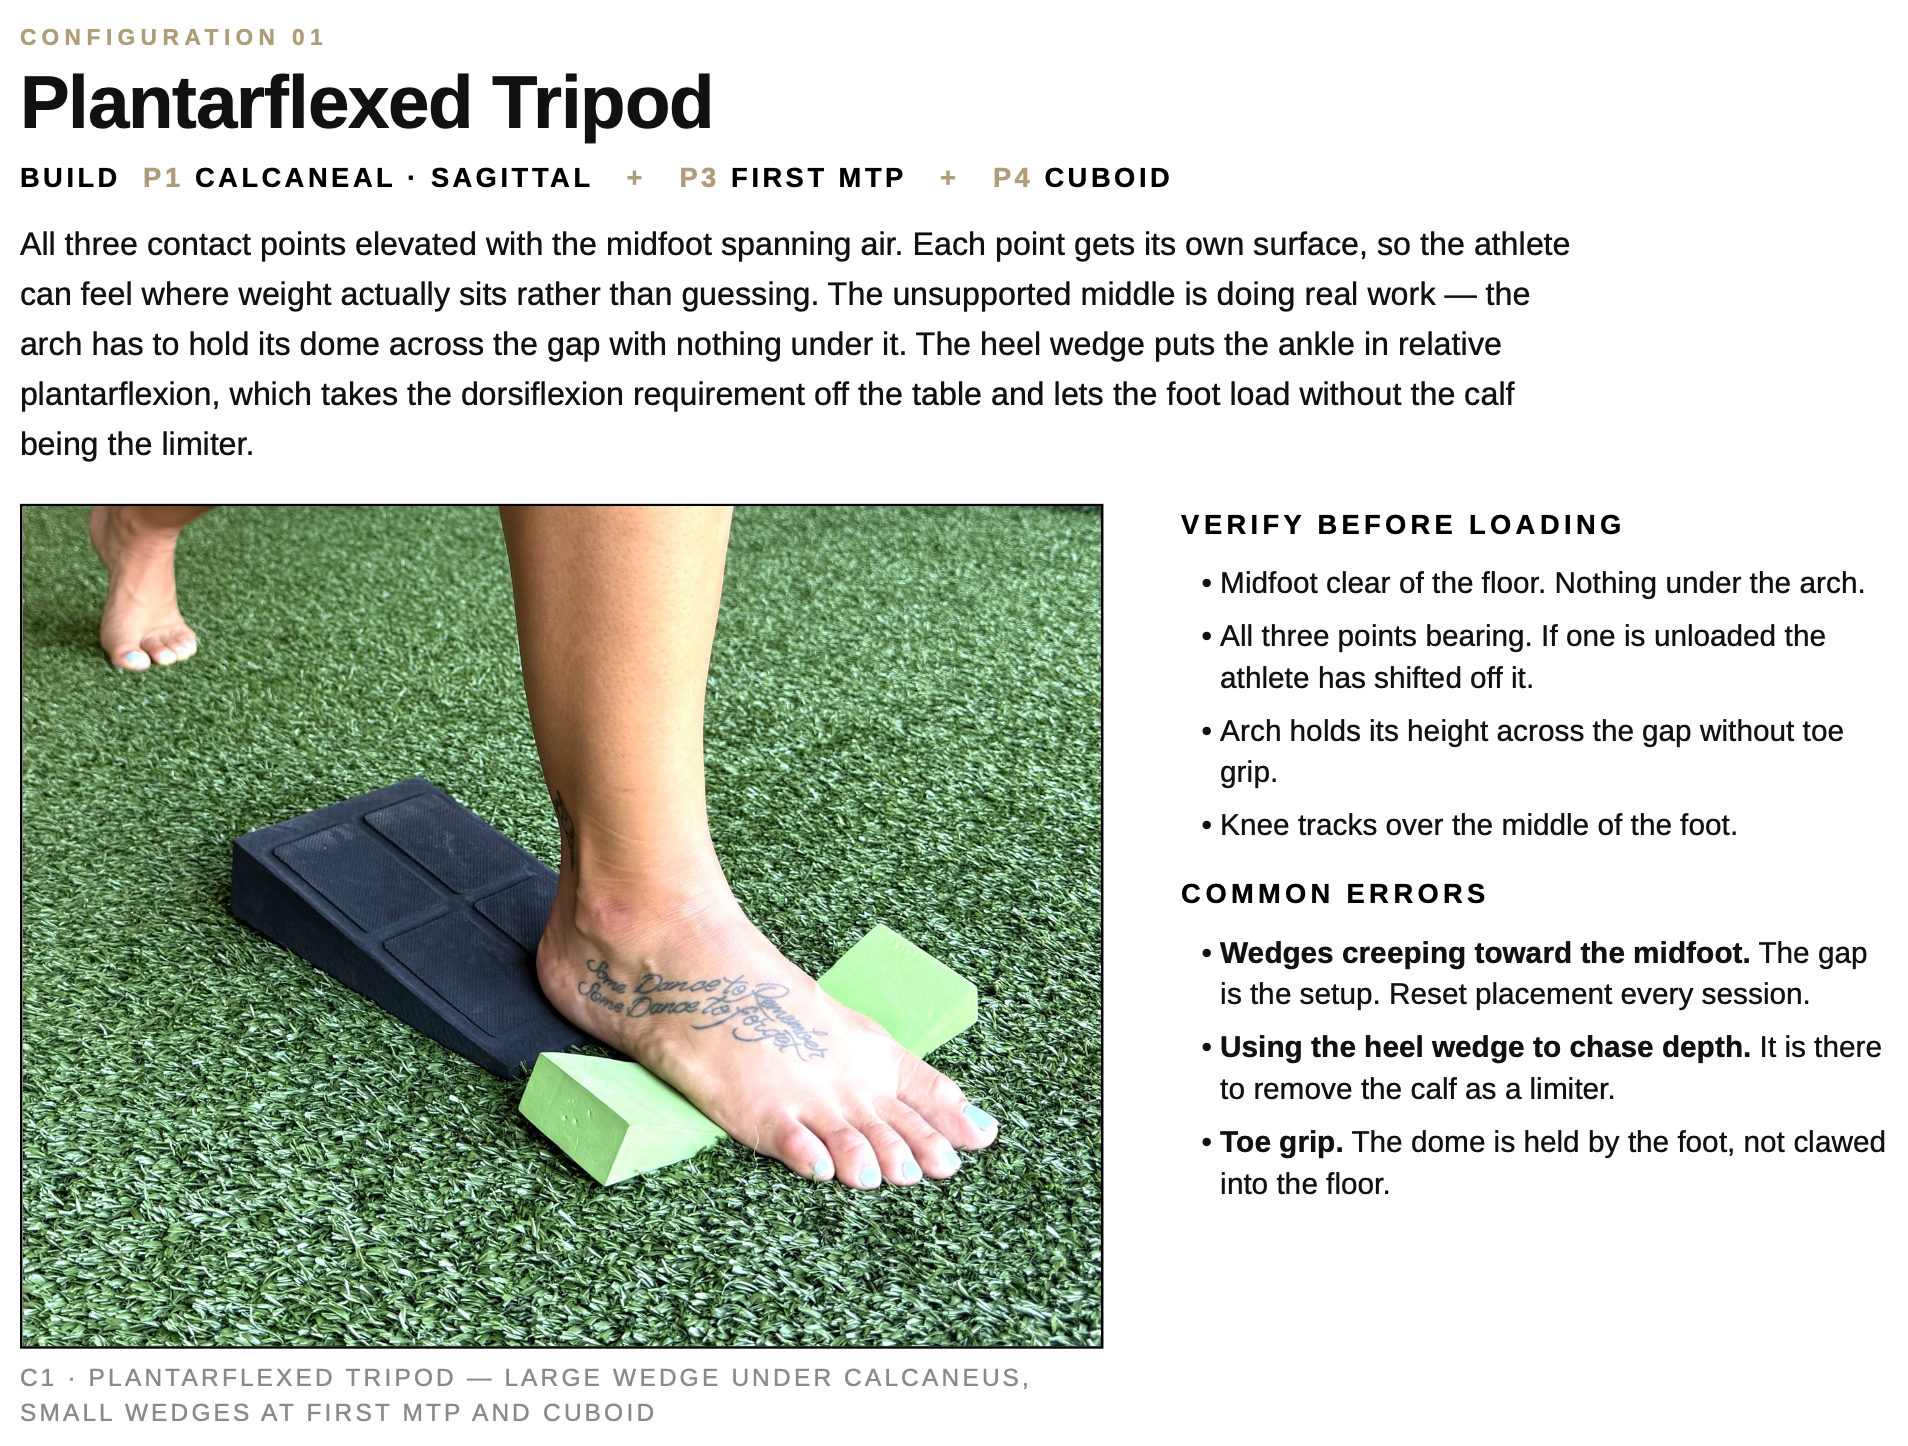
I-Plantarflexed Tripod
The plantarflexed tripod is the entry point. It gives the athlete three clear contact points and asks a basic question: can you find the foot without the floor doing the work for you?
The why is simple. We use this when the athlete needs to find and organize tripod pressure. If they cannot feel the first ray, cannot hold the arch without toe gripping, or cannot distribute pressure across the foot without collapsing into one edge, this setup gives them a clearer map.
The how is a large wedge under the calcaneus, a small wedge under the first MTP, and a small wedge under the cuboid. All three contact points are elevated while the midfoot spans air. The unsupported middle is the point. The athlete has to feel where the load sits and hold the arch across the gap instead of resting into passive support. The heel wedge also puts the ankle in relative plantarflexion, which takes dorsiflexion off the table as the immediate limiter and lets the foot load on its own terms.
The when is when you need an entry point. This is not the most advanced setup. It is the one that tells you whether the athlete can find the foot in the first place. If they cannot find the tripod with wedges under the target points, they probably are not going to find it cleanly under speed, fatigue, or a reactive field demand.
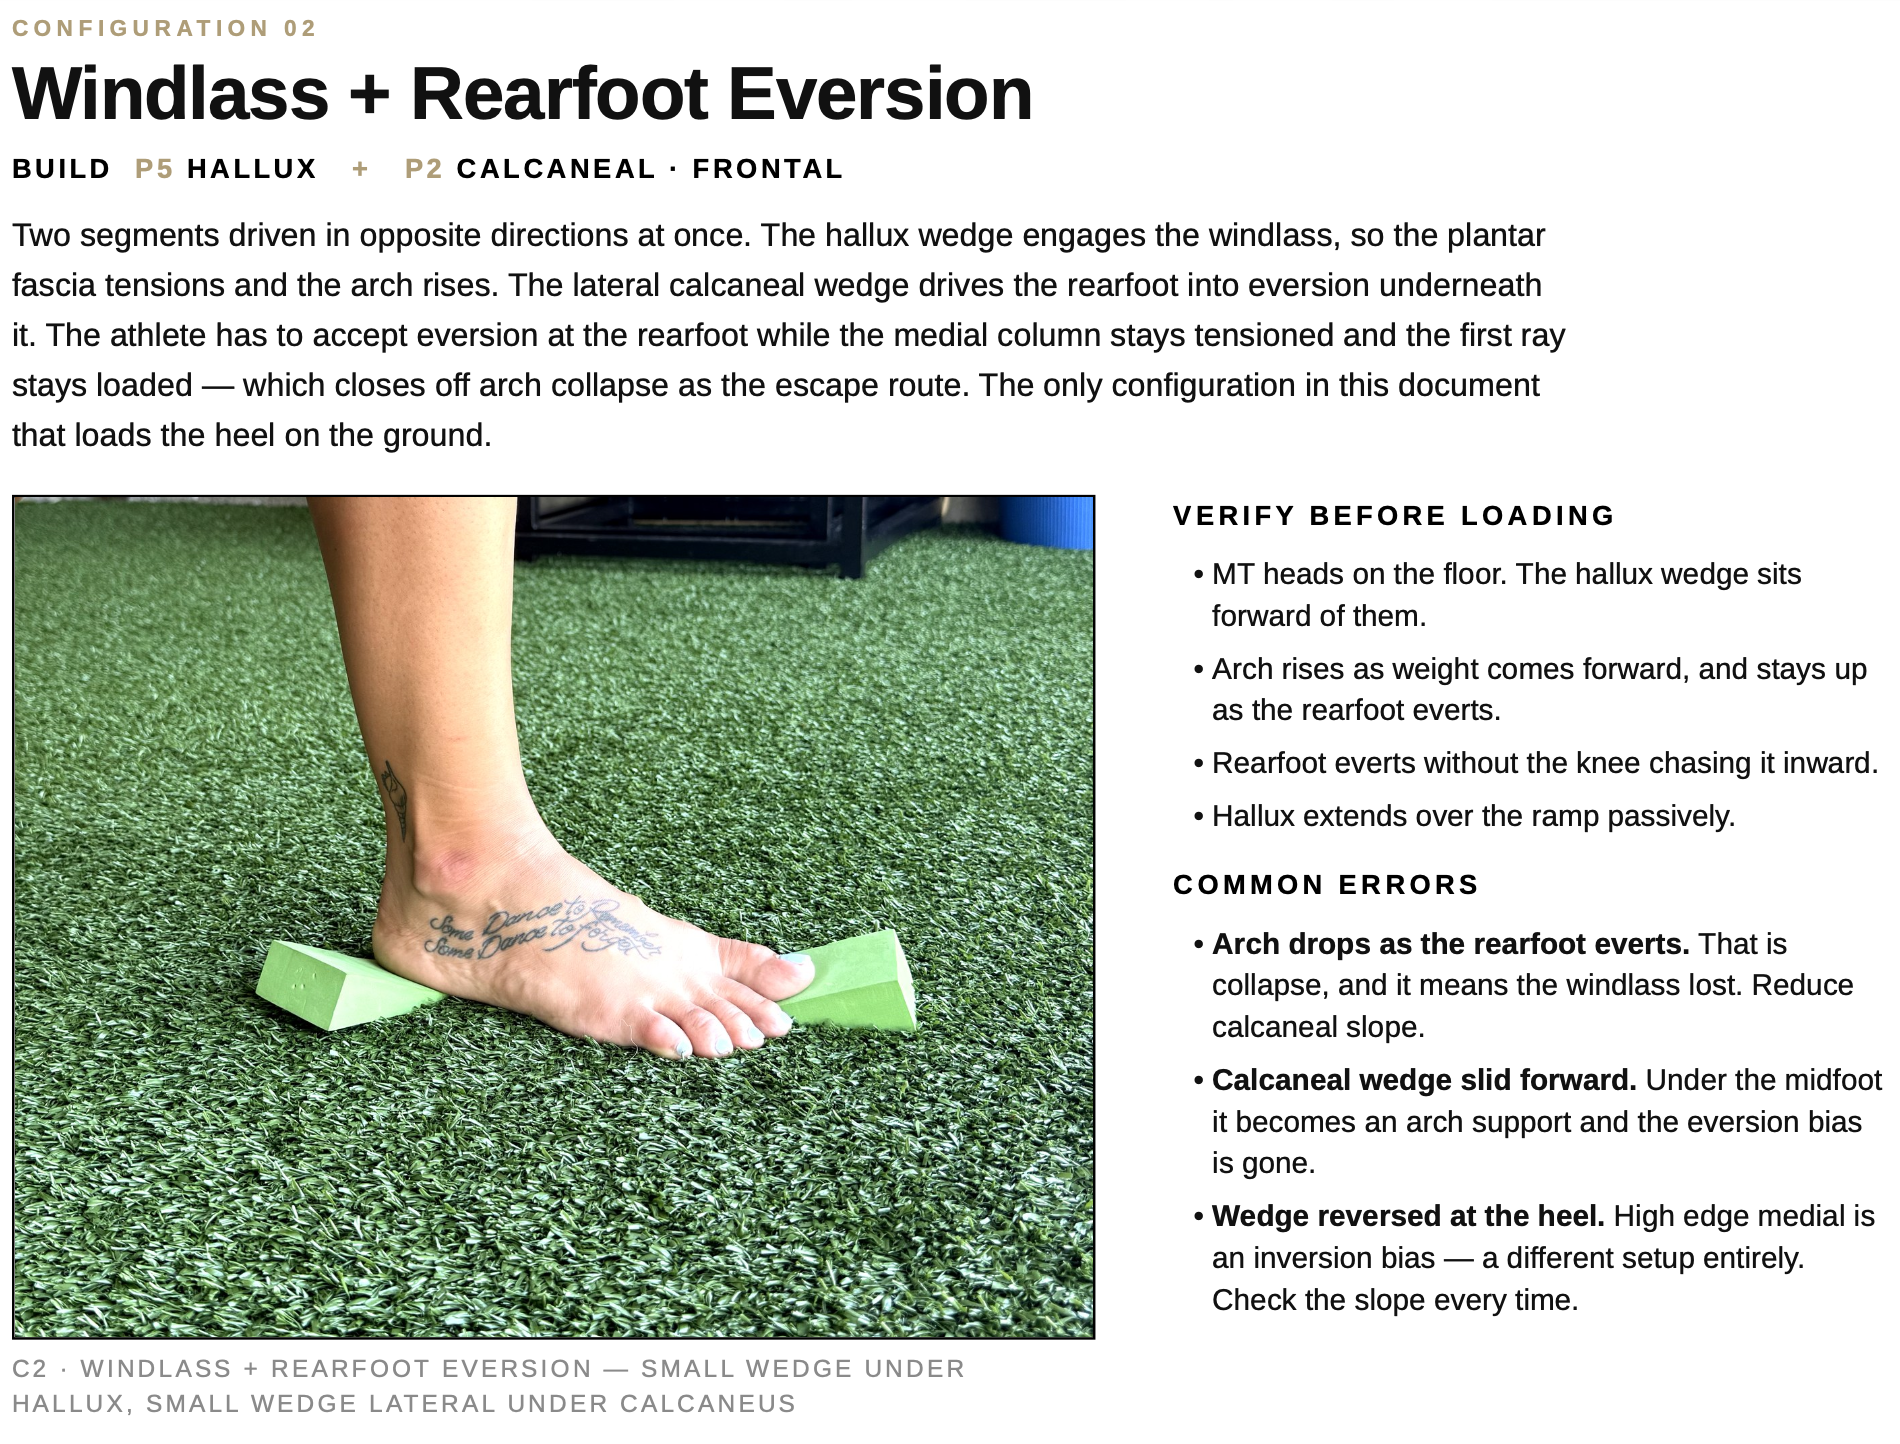
II-Windlass + Rearfoot Eversion
Windlass plus rearfoot eversion asks a more specific question: can the athlete accept rearfoot eversion without losing the medial column?
The why is to separate two things that often collapse together. A lot of athletes can make one end of the foot work if the other end is allowed to give way. This configuration closes that escape route. The hallux wedge tensions the plantar fascia and helps bring the arch into play, while the calcaneal wedge asks the rearfoot to evert underneath it. Now the athlete has to accept motion at the rearfoot while keeping the first ray loaded and the medial column organized.
The how is a small wedge under the hallux and a small wedge under the lateral calcaneus. The hallux wedge biases the big toe into extension, bringing the windlass into the setup. The calcaneal wedge biases the rearfoot toward eversion. The goal is not simply to make the arch rise or make the heel move. The goal is to hold both demands together: rearfoot eversion with medial-column tension.
The when is when the athlete avoids pronation, collapses when the rearfoot everts, cannot keep the first ray loaded, or needs to tolerate frontal-plane demand without the midfoot giving way. This can be especially useful when the foot looks like it has two separate options — stiff and protected, or loose and collapsed — but not a controlled middle.
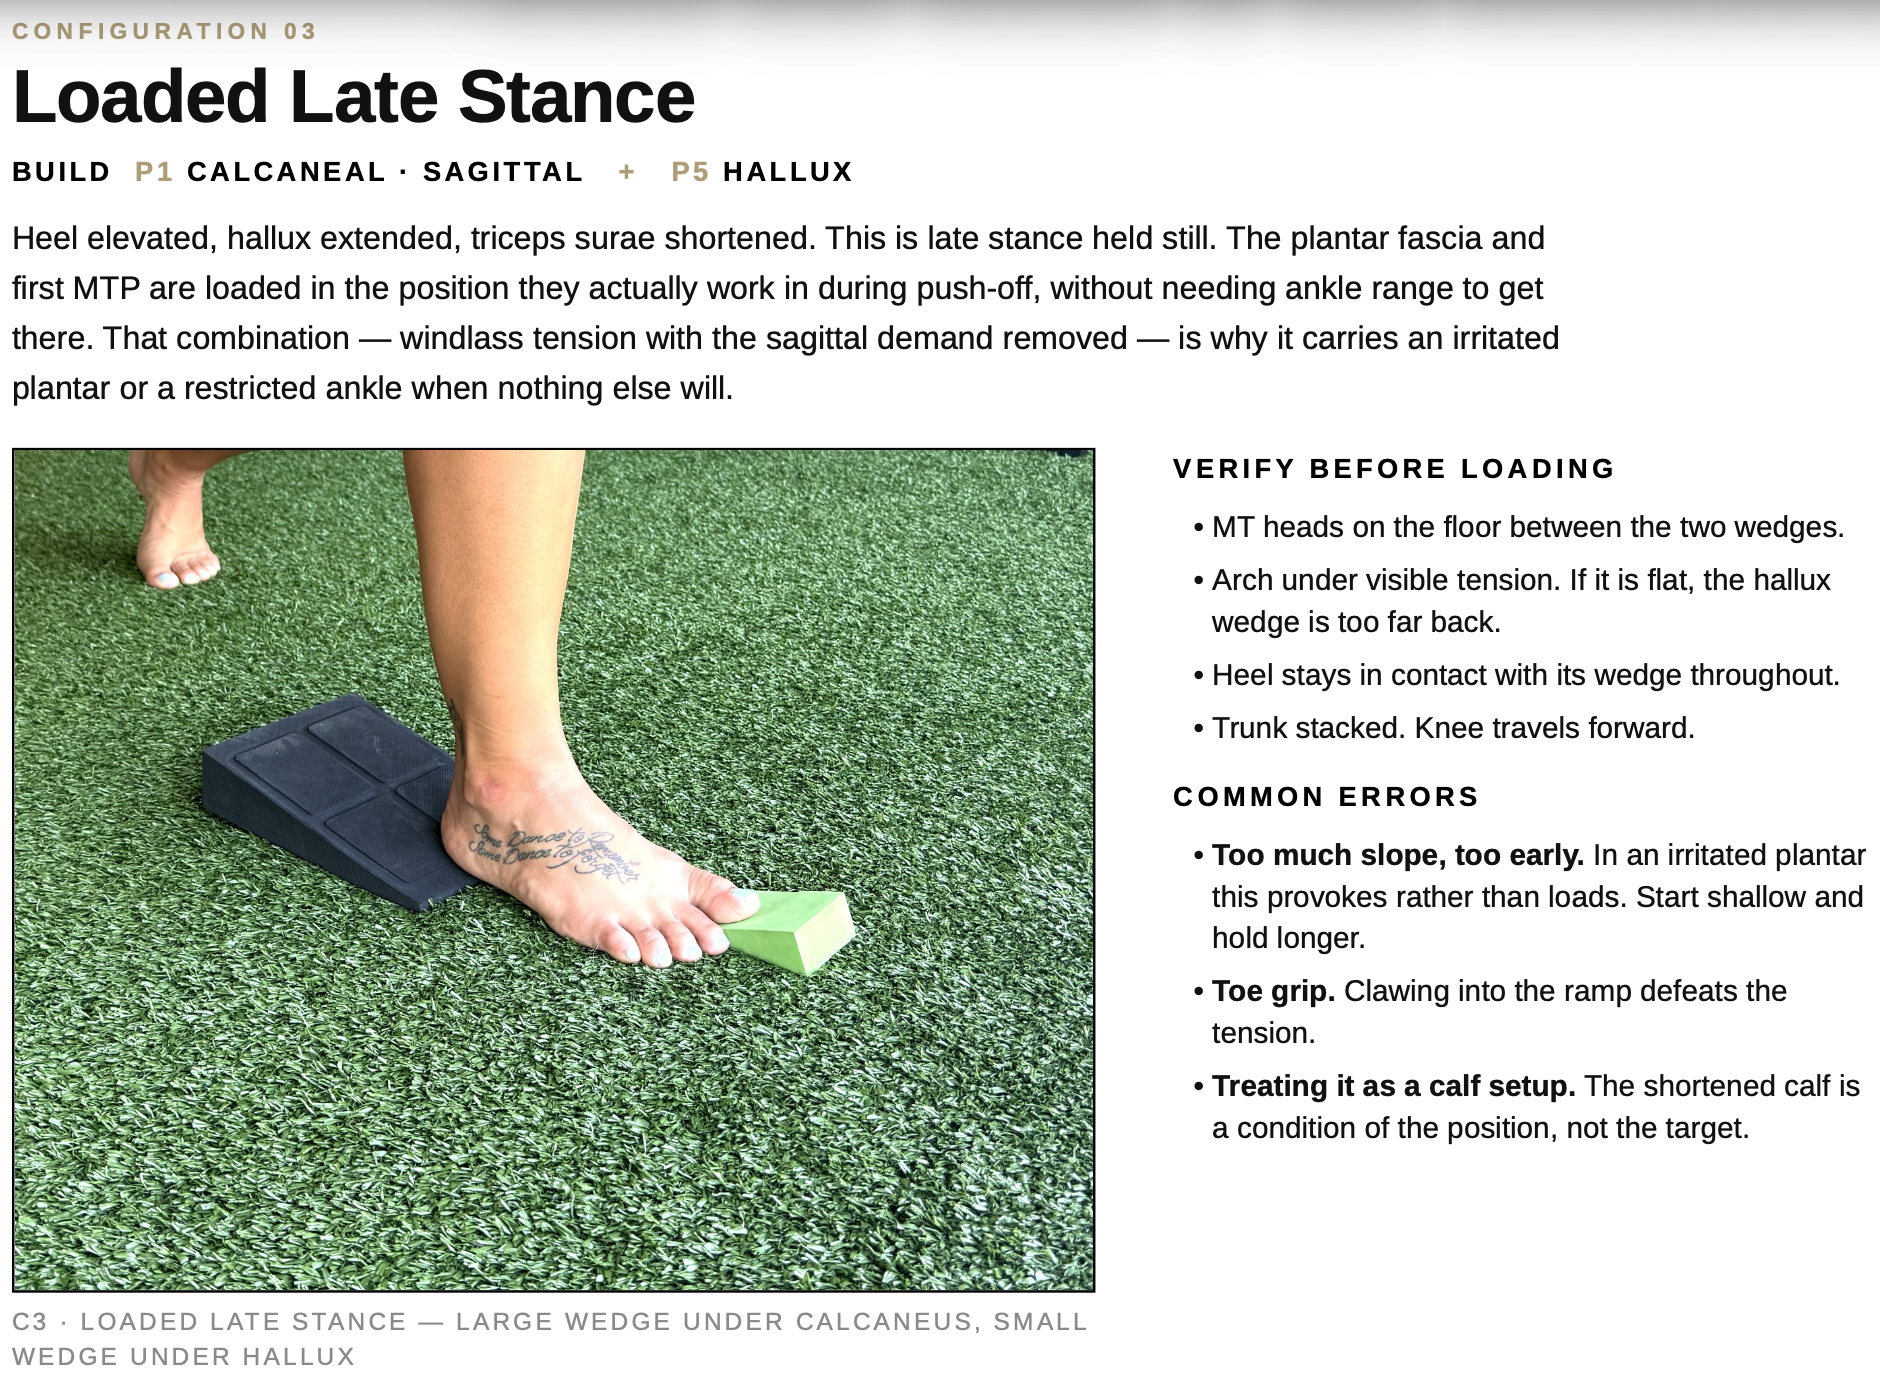
III-Loaded Late Stance
Loaded late stance is the push-off shape held still.
The why is to expose the plantar fascia, hallux, and first MTP to the position they must own at propulsion without making ankle dorsiflexion the limiting factor. This matters when an athlete has an irritated plantar fascia, a restricted ankle, or a push-off that never quite organizes. We are not trying to sprint off the wedge. We are giving the athlete a quieter version of the late-stance problem.
The how is a large wedge under the calcaneus and a small wedge under the hallux. The heel is elevated, the hallux is extended, and the plantar fascia is placed under tension. The calf is shortened by the setup, but the calf is not the target. The target is late stance: heel supported, hallux extended, arch tensioned, and the foot learning to tolerate that shape without needing full ankle range to get there.
The when is when the athlete needs to keep loading the foot while the ankle is being addressed elsewhere. It is also a clean option when the plantar fascia is irritable and the athlete is not ready for more dynamic propulsion work. In those cases, the early rungs are often the prescription: find the position, hold the position, and let the tissue tolerate tension before chasing more movement.
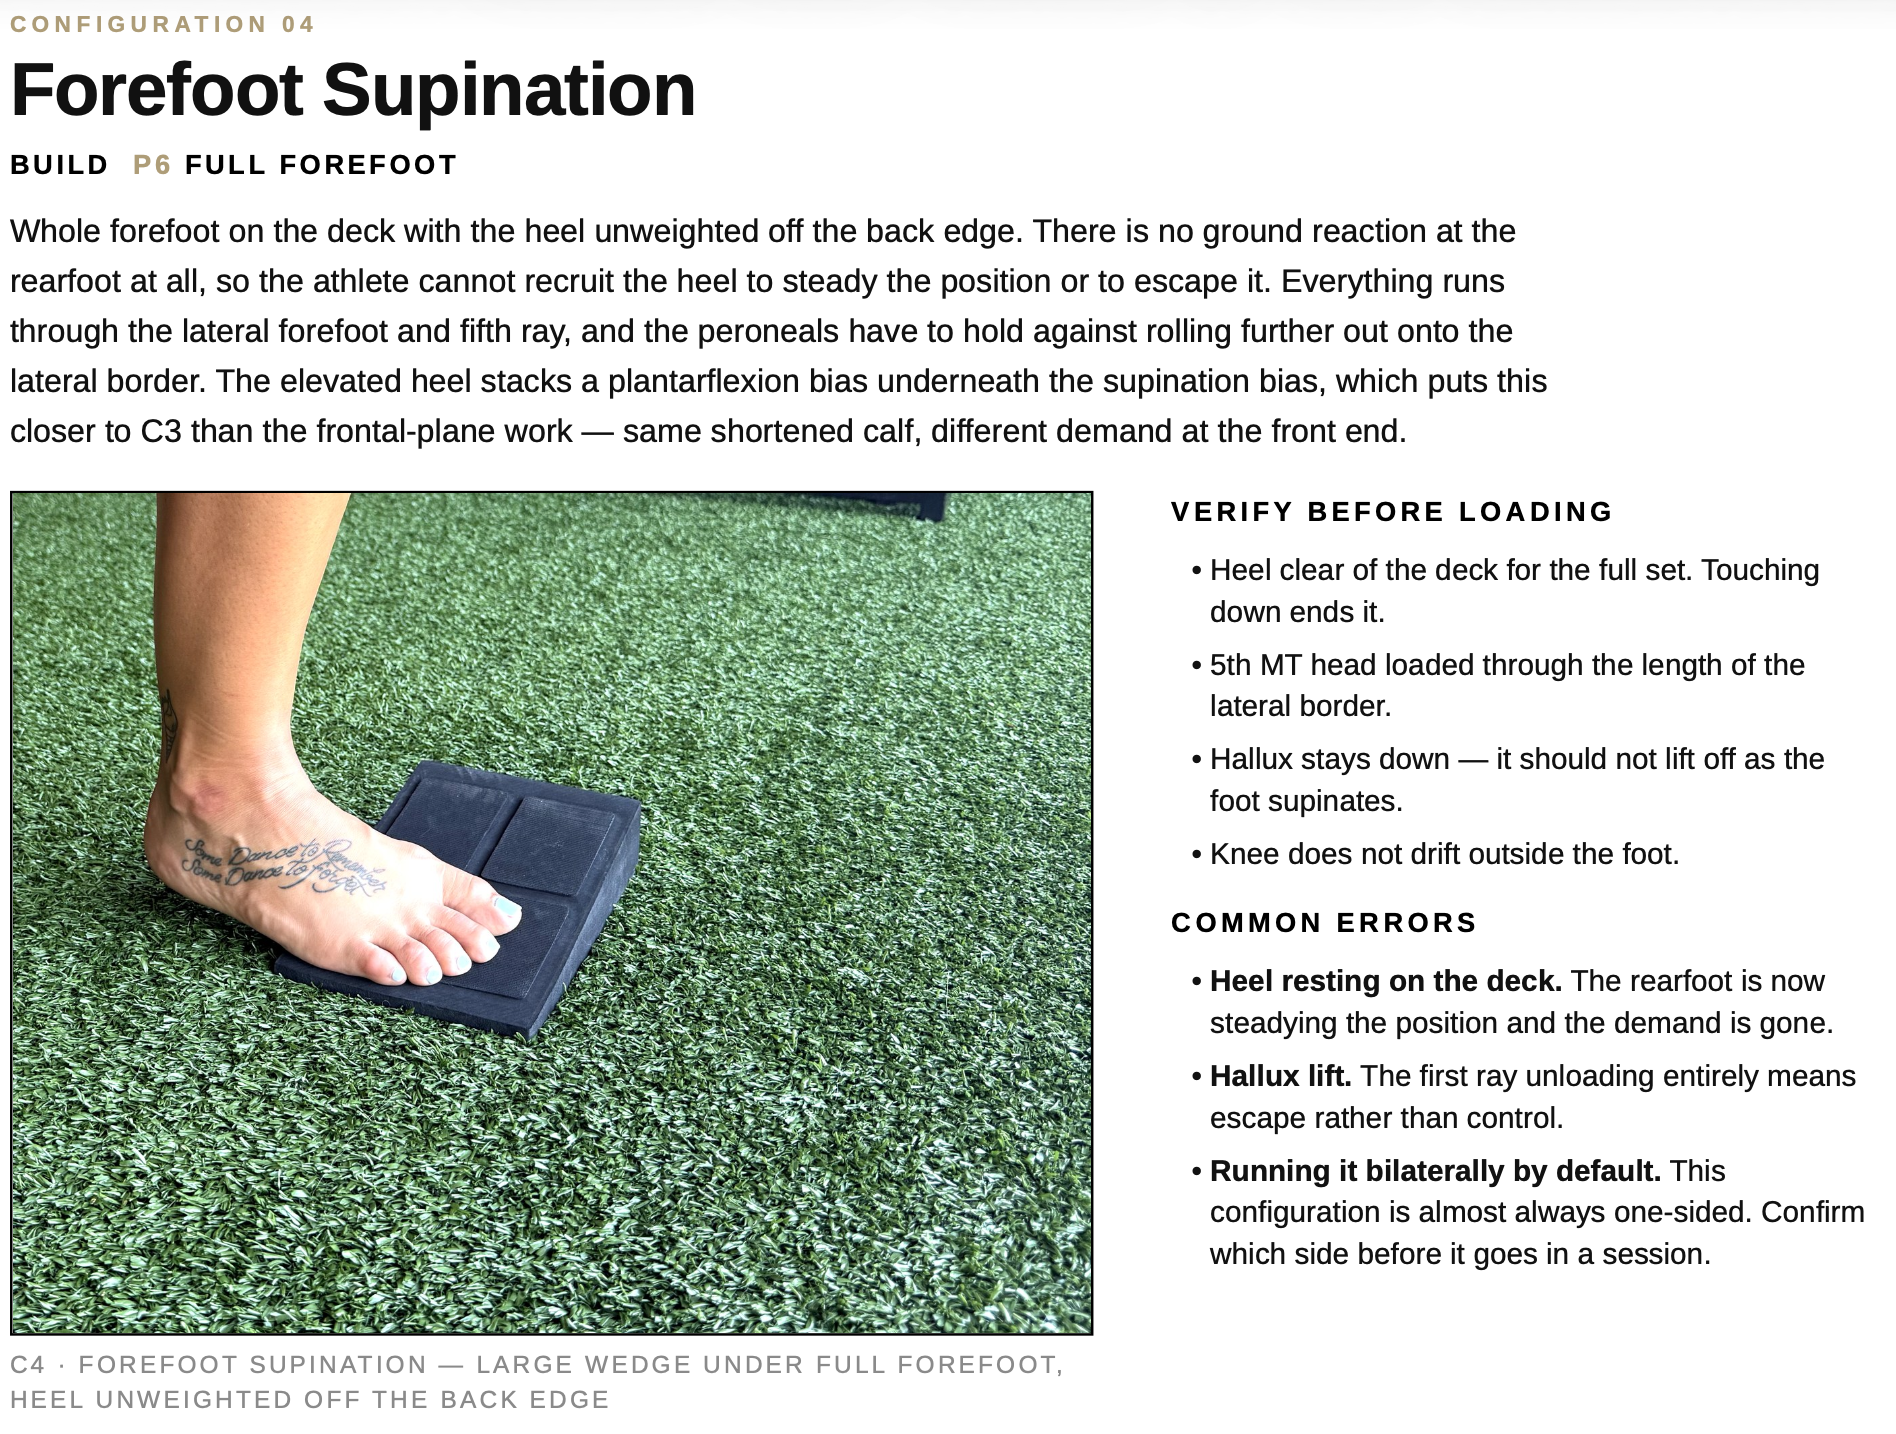
IV-Forefoot Supination
Forefoot supination asks whether the athlete can own the lateral forefoot without escaping through the heel or unloading the hallux.
The why is to build or test lateral-column control. Some athletes live too far into pronation and never access the lateral column cleanly. Others roll further out onto the outside border without actually controlling it. This setup gives you a way to see whether the athlete can load the fifth ray and hold the position without drifting, gripping, or using the rearfoot as a crutch.
The how is the full forefoot on the large wedge, with the heel unweighted off the back edge. That detail matters. If the heel touches down, the rearfoot is now helping steady the position, and the demand has changed. With the heel clear, the athlete has to organize the task through the lateral forefoot and fifth ray while keeping the hallux from lifting off as an escape.
The when is when the athlete cannot access the lateral column, avoids a lateral push, lives too far into pronation, or shifts load onto a side that does not actually own the position. This one should not be thrown in bilaterally by default. It is usually prescribed with a specific side and a specific reason.
Across all four configurations, the progression is the same: find it, hold it, move through it, load it on one side. The exercise menu does not need to explode. The wedge changes the position; the ladder changes the demand.
Start with a static stance or weight shift. Can the athlete find the pressure target without guessing? Then move to an isometric hold. Can they hold the position under time without gripping, collapsing, or drifting? Can they keep the pressure map while the joints move? The wedge resource uses this same four-rung ladder across configurations: static stance/shift, isometric hold, slow bilateral work, and split/unilateral work.
The stop rules are just as important as the progression. If the position degrades inside the set, the set is over. Reduce the slope or drop a rung. If the arch drops and the knee falls in, that is not productive loading. If the toes grip, the athlete is probably fighting the position instead of accepting it. If the side is unclear, confirm it before the session starts. Small errors change the entire setup.
That is the practical value of wedges. They give us a way to make the problem clearer without making the session bigger. They help the athlete feel a position, load a specific structure, and show us whether they can hold it as the demand increases. Used well, wedges simplify the decision. Used poorly, they just create more noise.
So the question is not just, “Should we wedge this athlete?” The better question is, “What foot position does this athlete need to find, load, and control?” If a wedge helps answer that, it belongs. If it does not, the floor may be enough.
This article is part of the Coach’s Foot and Ankle Playbook series, built to help coaches better observe, interpret, and train the foot-ankle complex in real sporting movement. For the full framework, progressions, and coaching applications, check out the Coach’s Foot and Ankle Playbook here.

Wedges Are a Tool, Not a Trick
Wedges have been a common tool in performance and rehab spaces for a long time, and for good reason. They are simple, accessible, easy to implement, and they give coaches and therapists a way to change how the foot interacts with the ground almost immediately. But like a lot of useful tools, they can also get used too casually. A wedge gets thrown under the heel, under the big toe, under the outside of the foot, or somewhere near the arch, and the athlete is told to squat, shift, hold, or balance without much clarity on what the setup is actually supposed to change.
That does not make wedges useless. It just means they need to be used with more precision.
The majority of athletes I’ve worked with have some degree of limitation in their feet. That's not to say they all have a foot injury or “problem”, but the foot-ankle complex is commonly underdeveloped, under-coached, or underloaded relative to the demands placed on it. In team settings, the foot and ankle often get buried underneath the larger categories: lower-body strength, sprint mechanics, change of direction, conditioning, or rehab progressions. Even in rehab, the foot can become an afterthought unless the athlete has a clear foot or ankle diagnosis.
Neglecting the foot-ankle complex can quickly become problematic. The foot is the first structure to meet the ground and the last structure to leave it. So if the athlete cannot feel the ground, organize pressure, access usable range, tolerate deformation, hold position, or re-stiffen at the right time, the rest of the system must work around that. Sometimes that workaround shows up locally as plantar fasciitis, Achilles irritation, ankle instability, or calf symptoms. Other times it shows up somewhere else entirely: knee irritation, hip strategy, trunk compensation, poor braking, incomplete push-off, or a general lack of spring.
This is where wedges become useful. They give us a bridge between identifying a foot-ankle limitation and precisely loading the specific structures (or positions) that need to improve. The primary mechanism of wedges is modifying the contact points and therefore foot pressure, which influences the kinematics of the foot and everything up the chain. That gives the athlete a clearer task than simply standing on the floor and being told to “use the arch,” “find the big toe,” or “keep the knee out.”
A wedge is not magic. It does not automatically fix the foot, wake up the arch, unlock the ankle, or clean up a contact by itself. It changes the conditions. It gives the athlete a specific position to find and a specific pressure problem to solve. From there, the value comes from how well the athlete can feel it, hold it, and eventually move through it without gripping, collapsing, or escaping the position.
So the first question is not, “Should we use wedges with every athlete?” The answer is no. They are not a default requirement. But they are also not reserved only for athletes coming off foot and ankle injuries. I think about wedges when one of three things shows up.
The first is a pressure problem. The athlete cannot find or load a specific part of the foot. Maybe they cannot access the first ray without collapsing medially. Maybe they avoid the lateral column. Maybe they cannot feel the heel without sitting back into it. Maybe they grip the toes every time they try to stabilize.
The second is a position problem. The athlete may have the range or capacity somewhere in the system, but they cannot organize it in a usable stance. They can show you a shape on the table, but the second they stand, shift, squat, split, or load one side, the position disappears.
The third is a loading problem. The athlete needs exposure to the foot-ankle structures, but the full sporting demand is too aggressive, too fast, or too noisy. This is where wedges can be especially valuable. They let us load the foot in a safer, more controlled window while still asking for real tissue behavior: pressure, tension, deformation, stiffness, and positional control.
From there, the process is pretty simple. Observe the athlete first. Where does the contact break down? Are they struggling to find the ground, manage the transition, or finish the push-off? Then screen the position. Can they access the range? Can they find the pressure point? Can they hold the arch without gripping? Can the rearfoot move without the knee chasing it? Can they load the lateral column without rolling off the foot? Once we have some idea of the limiter, the wedge gives us a controlled way to build the missing piece.
The important part is that each wedge configuration should answer a different question. We are not just adding foam under the foot because it looks more advanced. We are choosing a setup because we want to know whether the athlete can find, load, and control a specific foot position.
For this overview, four configurations matter most: (I) plantarflexed tripod, (II) windlass plus rearfoot eversion, (III) loaded late stance, and (IV) forefoot supination. Each one has a different purpose, and each one gives the athlete a different problem to solve. The internal wedge resource organizes these as four defined configurations built from a small position library, with the same progression ladder shared across them.
I-Plantarflexed Tripod
The plantarflexed tripod is the entry point. It gives the athlete three clear contact points and asks a basic question: can you find the foot without the floor doing the work for you?
The why is simple. We use this when the athlete needs to find and organize tripod pressure. If they cannot feel the first ray, cannot hold the arch without toe gripping, or cannot distribute pressure across the foot without collapsing into one edge, this setup gives them a clearer map.
The how is a large wedge under the calcaneus, a small wedge under the first MTP, and a small wedge under the cuboid. All three contact points are elevated while the midfoot spans air. The unsupported middle is the point. The athlete has to feel where the load sits and hold the arch across the gap instead of resting into passive support. The heel wedge also puts the ankle in relative plantarflexion, which takes dorsiflexion off the table as the immediate limiter and lets the foot load on its own terms.
The when is when you need an entry point. This is not the most advanced setup. It is the one that tells you whether the athlete can find the foot in the first place. If they cannot find the tripod with wedges under the target points, they probably are not going to find it cleanly under speed, fatigue, or a reactive field demand.
II-Windlass + Rearfoot Eversion
Windlass plus rearfoot eversion asks a more specific question: can the athlete accept rearfoot eversion without losing the medial column?
The why is to separate two things that often collapse together. A lot of athletes can make one end of the foot work if the other end is allowed to give way. This configuration closes that escape route. The hallux wedge tensions the plantar fascia and helps bring the arch into play, while the calcaneal wedge asks the rearfoot to evert underneath it. Now the athlete has to accept motion at the rearfoot while keeping the first ray loaded and the medial column organized.
The how is a small wedge under the hallux and a small wedge under the lateral calcaneus. The hallux wedge biases the big toe into extension, bringing the windlass into the setup. The calcaneal wedge biases the rearfoot toward eversion. The goal is not simply to make the arch rise or make the heel move. The goal is to hold both demands together: rearfoot eversion with medial-column tension.
The when is when the athlete avoids pronation, collapses when the rearfoot everts, cannot keep the first ray loaded, or needs to tolerate frontal-plane demand without the midfoot giving way. This can be especially useful when the foot looks like it has two separate options — stiff and protected, or loose and collapsed — but not a controlled middle.
III-Loaded Late Stance
Loaded late stance is the push-off shape held still.
The why is to expose the plantar fascia, hallux, and first MTP to the position they must own at propulsion without making ankle dorsiflexion the limiting factor. This matters when an athlete has an irritated plantar fascia, a restricted ankle, or a push-off that never quite organizes. We are not trying to sprint off the wedge. We are giving the athlete a quieter version of the late-stance problem.
The how is a large wedge under the calcaneus and a small wedge under the hallux. The heel is elevated, the hallux is extended, and the plantar fascia is placed under tension. The calf is shortened by the setup, but the calf is not the target. The target is late stance: heel supported, hallux extended, arch tensioned, and the foot learning to tolerate that shape without needing full ankle range to get there.
The when is when the athlete needs to keep loading the foot while the ankle is being addressed elsewhere. It is also a clean option when the plantar fascia is irritable and the athlete is not ready for more dynamic propulsion work. In those cases, the early rungs are often the prescription: find the position, hold the position, and let the tissue tolerate tension before chasing more movement.
IV-Forefoot Supination
Forefoot supination asks whether the athlete can own the lateral forefoot without escaping through the heel or unloading the hallux.
The why is to build or test lateral-column control. Some athletes live too far into pronation and never access the lateral column cleanly. Others roll further out onto the outside border without actually controlling it. This setup gives you a way to see whether the athlete can load the fifth ray and hold the position without drifting, gripping, or using the rearfoot as a crutch.
The how is the full forefoot on the large wedge, with the heel unweighted off the back edge. That detail matters. If the heel touches down, the rearfoot is now helping steady the position, and the demand has changed. With the heel clear, the athlete has to organize the task through the lateral forefoot and fifth ray while keeping the hallux from lifting off as an escape.
The when is when the athlete cannot access the lateral column, avoids a lateral push, lives too far into pronation, or shifts load onto a side that does not actually own the position. This one should not be thrown in bilaterally by default. It is usually prescribed with a specific side and a specific reason.
Across all four configurations, the progression is the same: find it, hold it, move through it, load it on one side. The exercise menu does not need to explode. The wedge changes the position; the ladder changes the demand.
Start with a static stance or weight shift. Can the athlete find the pressure target without guessing? Then move to an isometric hold. Can they hold the position under time without gripping, collapsing, or drifting? Can they keep the pressure map while the joints move? The wedge resource uses this same four-rung ladder across configurations: static stance/shift, isometric hold, slow bilateral work, and split/unilateral work.
The stop rules are just as important as the progression. If the position degrades inside the set, the set is over. Reduce the slope or drop a rung. If the arch drops and the knee falls in, that is not productive loading. If the toes grip, the athlete is probably fighting the position instead of accepting it. If the side is unclear, confirm it before the session starts. Small errors change the entire setup.
That is the practical value of wedges. They give us a way to make the problem clearer without making the session bigger. They help the athlete feel a position, load a specific structure, and show us whether they can hold it as the demand increases. Used well, wedges simplify the decision. Used poorly, they just create more noise.
So the question is not just, “Should we wedge this athlete?” The better question is, “What foot position does this athlete need to find, load, and control?” If a wedge helps answer that, it belongs. If it does not, the floor may be enough.
This article is part of the Coach’s Foot and Ankle Playbook series, built to help coaches better observe, interpret, and train the foot-ankle complex in real sporting movement. For the full framework, progressions, and coaching applications, check out the Coach’s Foot and Ankle Playbook here.
YOUTUBE
Share Our YouTube Channel



Movement Literacy Concepts - Kinetic [02:16]
The final piece of our movement literacy framework addressing...
Trunk & Spine [01:40]
Basic spinal mechanics and how they relate to movement...
Movement Literacy - Hips [02:13]
Addressing the basics of hip movement in our framework...
Movement Literacy - Foot [01:49]
Part 1 of our movement literacy framework covering mechanics...
Shoulder Mechanics [01:46]
Fourth segment covering basic shoulder mechanics...
Trunk/Bracing [03:36]
Learn key trunk bracing techniques for safe movement...
Shoulder/Scapula [02:32]
Scapula mechanics and shoulder stability fundamentals...

Movement Literacy [02:57]
An overview of essential movement literacy concepts...
Optimizing Feet & Ankles [01:37]
Techniques to improve foot and ankle performance...
Foot & Ankle Coaching [02:02]
Effective coaching and cueing for foot and ankle...
Basic Foot & Ankle Functions [02:28]
Understanding the fundamental functions of foot and ankle...
Cueing & Coaching the Neck [02:24]
Learn neck movement and coaching strategies...

Human First Newsletter
Human First is a weekly note on the parts of high performance that have nothing to do with training leadership, decision-making, self-awareness, and navigating the demands of work and life with more clarity and intent.
Our technical coaching, rehab, and athlete-management content still lives on the website; this is where we think out loud about everything around it.
©2026 Rude Rock Strength and Conditioning, LLC